
When working on side projects, I find myself often converting React web applications into React Native mobile applications.
This is due to the fact that, even when the ultimate goal is to develop a mobile app, it can be difficult to receive feedback from friends/testers as they would have to either download the mobile application or load the application via a mobile test tool (ex. TestFlight). Therefore, I frequently find it easier to quickly hack up prototypes as React web apps and then, after enough user feedback and development iterations, convert the web app into a mobile app.
Additional reasons why I choose to implement web apps before converting them into mobile apps:
However, one should note that there are also disadvantages for this approach. For example, as per the Lean Startup principal, startup app projects should be as simple as possible; developers should seek user feedback and iterate constantly off of the simple prototype.
 Cycle defined in the Lean Startup
Implementing a web app prior to converting to mobile can be time consuming; at some point, developers need to decide whether they should continue to maintain the web application or discontinue the web app development.
Although React and React Native are great tools for web and mobile development respectively, and share common syntaxes, there currently does not exist any standard tool for converting React applications into React Native applications. Hence, much of the side projects that I develop involve manual transposition from React to React Native.
The following are common syntactical differences I have stumbled upon when using React and React Native:
Note that these are just some of the differences between React and React Native development, and not an exhaustive list.
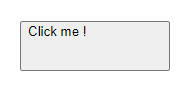
In React, button content/text is centered by default; in React Native, the content is naturally aligned in the top-left of the Button component.
 Button without alignment explicitly defined for React
 Button without alignment explicitly defined for React Native
Button-type components in React Native, such as TouchableHighlight, can only contain one child component.
<TouchableHighlight onPress={() => {}}>
  <>
    <Text>Hello World !</Text>
    <Image source={require('/hello.png')}>
  </>
</TouchableHighlight>
A common solution for ensuring single child elements for TouchableHighlight is to use fragments
<View>
  <Text>Hello World !</Text>
</View>
Text that is bound by a Text component, by requirement, in React Native
<div>
  Hello World !
</div>
Similar implementation in React that does not require a wrapper Text component
In React/HTML, flexboxes use horizontal, or "row", orientation by default. In React Native, flexboxes use vertical, or "column", orientation by default.
View components in React Native do not support gradient backgrounds.
The box-sizing attribute is not used in React Native as containers naturally account for border and padding as part of their width and height; in React/HTML, this would be equivelant to using box-sizing of border-box.
<Image source={require('hello.png')} />
Image component that uses source import in React Native
<Image src={{uri: 'hello.png'}} />
Image component that uses uri image path in React Native
Images in React Native do not support specific attributes such as borders, border radius, etc; to apply these styling changes, one needs to wrap the Image components in containers, and apply the styles to the container.
In React, without third-party libraries, styles can be applied to elements using in-line styles or classes from stylesheets; React Native does not support styles added via classes.
In React/HTML, border-radius can be defined in percentages (in addition to pixels, other units) whereas React Native does not support percentage values.
borderRadius: "50%"The percentage value is valid in React/HTML, not in React Native
In React Native, font-weight can only be defined via string-type values.
fontWeight: 500The above numeric font weight value is only valid for React/HTML, not in React Native
border: "1px solid #fff"Combined syntax only valid for React
borderWidth: "1px"
borderStyle: "solid"
borderColor: "#fff"
Separated syntax valid for both React and React Native
Similar rules are enforced for other styles such as padding and margin.
padding: "1px 2px 3px 4px"Combined syntax only valid for React
paddingTop: 1
paddingRight: 2
paddingBottom: 3
paddingLeft: 4
Separated syntax valid for both React and React Native
React Native, however, offers special horizontal and vertical combined padding and margins using paddingHorizontal, paddingVertical, marginHorizontal, marginVertical respectively.
paddingHorizontal: 1
paddingVertical: 2
React Native supported horizontal/vertical syntax
paddingTop: 1
paddingRight: 2
paddingBottom: 1
paddingLeft: 2
Equivalant syntax with same outcome supported for both React and React Native
Although there exist these minor syntactical discrepencies between React and React Native, these differences should not impose a major obstacle for the transposition from React to React Native as component and styling syntaxes remaining relatively the same. Furthermore, these differences should be less problematic for developers who have an abundant of experience context switching between the two libraries.
TestFlight:
https://developer.apple.com/testflight/
The Lean Startup:
http://theleanstartup.com/principles
Basic concepts of flexbox:
https://developer.mozilla.org/en-US/docs/Web/CSS/CSS_Flexible_Box_Layout/Basic_Concepts_of_Flexbox
React Fragments:
https://reactjs.org/docs/fragments.html
React Native Button:
https://reactnative.dev/docs/button
React Native TouchableHighlight:
https://reactnative.dev/docs/touchablehighlight
React Native Text:
https://reactnative.dev/docs/text
React Native View:
https://reactnative.dev/docs/view